下面请跟着图老师小编一起来了解下PS打造美女抽象照片教程,精心挑选的内容希望大家喜欢,不要忘记点个赞哦!
【 tulaoshi.com - ps图片合成教程 】
这是一个中等水平的教程,所以有些步骤会有点难,但是不妨来试一试吧!
注意:本教程使用PS CS6,所以有些截图看起来跟旧版的不太一样,而且有些笔刷是CS6才有的。
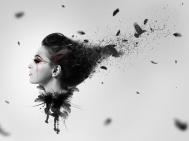
效果预览:

你需要准备:
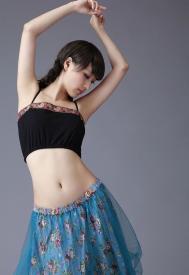
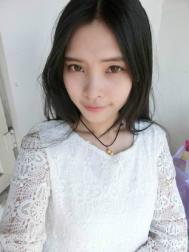
一张女孩照片
树皮纹理
喷溅笔刷
Step 1新建一个文件,大小为800px*1136px,背景色为#cccec9.
我们会在背景上加点纹理载入树皮纹理,用矩形选框工具圈出一个选区,如下图

将选区复制粘贴到文件里,调整它的大小来适合画布。按以下方式调整:
黑白:

色阶:

将混合模式设置为减去(不是CS6的可以用叠加代替)

在画布中央用一个白色的软笔刷加个高光

然后新建一个图层,用一些喷溅笔刷在上面随便画几笔我画出来的效果是这样的:

Step 2在PS里打开女孩图片,抠出女孩的形象然后粘贴到现在这个文件里:

对这个图层使用表(www.tulaoshi.com)面模糊,参数如下:

用任意的喷溅笔刷作为橡皮,将女孩图片的边缘像下图这样涂掉(注意图的时候调整笔刷大小)

将三个调整图层作为剪贴蒙版加在女孩图层上::
黑白

图层蒙版在黑白调整层上:

色阶

图层蒙版在色阶调整层上:

曲线:
(本文来源于图老师网站,更多请访问https://www.tulaoshi.com)
目前的效果:
(本文来源于图老师网站,更多请访问https://www.tulaoshi.com)
Step 3我们要在脸周围加一些树皮纹理用快速选择工具在树皮图片上选取一块,然后复制粘贴到这个文件里,如下图:

对这个新图层做变换,如下图:

选择这个新图层,使用调整边缘工具,参数如下(这样使这个树皮图层有粗略的边缘)

对树皮图层做如下三种调整:
黑白:

色阶:

曲线:
(本文来源于图老师网站,更多请访问https://www.tulaoshi.com)
然后我们可以复制多个树皮图层,并且将他们如下图所示放置在脸周围:

Step 4我们已经完成了纹理和图画的部分。让我们把图像合并图层并复制背景图层,使用仿制图章工具:

将仿制图章工具的笔刷设置为柔边圆

将下图所示的部分设为仿制源,然后将女孩脸的周围画成如下图的样子:

对这个新图层使用如下图层蒙版来隐藏一些部分:

你也可以在照片的不同位置使用一些液化效果:

目前的效果:
(本文来源于图老师网站,更多请访问https://www.tulaoshi.com)
Step 5我们会对图片进行微调并且加点颜色效果。通过如下调整实现效果(从下往上看)
曲线:
(本文来源于图老师网站,更多请访问https://www.tulaoshi.com)
图层蒙版在曲线调整图层上:

可选颜色:


色彩平衡

然后你就能看到最终效果啦!

注:更多精彩教程请关注图老师photoshop教程栏目,图老师PS群:249667984欢迎你的加入
来源:https://www.tulaoshi.com/n/20160401/2080847.html
看过《PS打造美女抽象照片教程》的人还看了以下文章 更多>>