今天图老师小编要向大家分享个Maya Nurbs 汽车轮胎建模教程,过程简单易学,相信聪明的你一定能轻松get!
【 tulaoshi.com - 设计软件 】

Create Tire Pattern
Open your Maya, from top view, create these curves (Fig 1), and move them to 6 of y-axis (go up). Remember...you must use closed curves. And of course... you could create another tire pattern. :)
打开 Maya, 切换到前视窗 , 创建如 (fig 1) 一样的曲线,并将它在 y 轴向上移动 6 个单位 . 记住 : 曲线必须是闭合的 . 另外,你也可以创建你自己喜欢的曲线样式 .
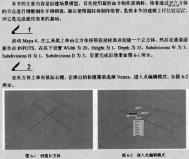
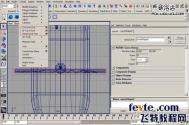
Then from front view, create a NURBS cylinder (radius 5, sections 12, spans 6), rotate it to 90°, name this cylinder master_ tire (Fig 2).
回到前视窗,创建一个 Nurbs 圆柱体 (radius 5,sections 12,spans 6), 旋转 90 度,将其命名为 master_tire (fig 2).
Fig 1
Fig 2
Tire Detail
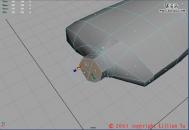
From side view, select these outer CV's (Fig 3) and scale them smaller (Fig 4). Note : use center pivot axis to scale.
切换到侧视窗中,选择外沿的 CV 点 (fig 3) 将它们拉伸如 (fig 4). 注意 : 使用中心黄点来拉伸 .
Fig 3
Fig 4
Now duplicate this master_ tire and name the new one master_ copy , then hide master_ tire (select Master_tire then hit CTRL-H)
(本文来源于图老师网站,更多请访问https://www.tulaoshi.com/shejiruanjian/)复制一条 master_tire 曲面 , 将其命名为 master_copy, 将 master_tire 隐藏起来 ( 选择 master_tire 曲面按 Ctrl+H 组合键 ).
Go to top view, rescale and adjust your curves to this position (Fig 5) (don't overlatuLaoShi.comp the "master_copy" body), and then Shift-select master_copy and edit nurbs project curve on surface .
Note : you must do this projection from top view.
Then from persp view you will have these new projection curves (Fig 6)
切换到顶视窗 , 将你的曲线重新拉伸缩放到如 (fig 5)( 不要超过 master_copy) ,然后按 Shift 键点选 master_copy ,选择 edit nurbs project curve on surface 命令将曲线投影到曲面上 .
记住 : 你必须在顶视窗中投影 .
回到透视窗你将得到一些投影的曲线 (fig 6).
Fig 5 
Fig 6
With the new projection curves still selected, go to menu surfaces extrude option box , select Distance and enter -0.15 on Extrude Length , output g
1234下一页来源:https://www.tulaoshi.com/n/20160318/1892268.html
看过《Maya Nurbs 汽车轮胎建模》的人还看了以下文章 更多>>