首页 相关文章 Illustrator绘制时尚大气的波普人像效果

Illustrator绘制时尚大气的波普人像效果

波普艺术鼎盛于50年代中期的美国,也被称为流行艺术、通俗艺术。在这一艺术风格的影响下,作为创作灵感的来源,可以在对肖像创作上下一番功夫,将人像转而绘制成波普风插图,在此基础上再来制作出新颖别致的波普风格的海报、插画甚至是包装设计、封面设计等平面作品。

波普风最大的特点是用色大胆鲜艳,并且善用对比。有时还会选择圆点等纹理图案作为点缀。

我们今天要学习的是利用AI来绘制波普艺术风格人像。我们会运用到艺术画笔和叠加圆点图案等创作方式。
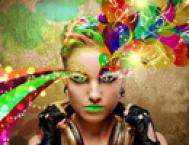
先看看效果图

Illustrator绘制时尚大气的波普人像效果,PS教程,图老师教程网

一、临摹肖像轮廓

打开AI,新建文档。对于文档大小没有严格规定。如果是初学,可以试着和我的文档大小保持一致,参考下图,以便接下可以参考我将要设定的各种参数值。

Ill...<a href="https://www.tulaoshi.com/n/20160216/1571002.html" target="_blank">[ 查看全文 ]</a></p>
            <div class="img_yyy_2">
                <span>2016-02-16</span>
                                                <i>标签:</i>
                <div class="yyy_2_a"><a href="https://www.tulaoshi.com/illustrator/" target="_blank">Illustrator</a> <a href="https://www.tulaoshi.com/coreldraw/" target="_blank">CorelDRAW</a></div>
                                </div>
		</div>
	</div>
</div>

<div class="xiangguan_gg xiangguan_reader clearfix">
    <div class="xiang_892_1" style="width:1158px;">
      <h3><a href="https://www.tulaoshi.com/n/20160216/1571002.html" target="_blank">Illustrator绘制时尚大气的波普人像效果</a>的相关文章</h3>
    </div>
    <div class="xiang_892_2" style="width:1158px;">
      <ul id="loadmore_container" style="width:1158px;">
                <li>
          <div class="xiang_892_2_1"><a href="/reader/1563570" target="_blank"><img src="https://img.tulaoshi.com/201602/15/69fca904d66aa29dcc55791192485004_thumb_189.jpg" width="224" height="173"></a></div>
          <div class="xiang_right clearfix">
            <div class="xiang_right_1"><A href="https://www.tulaoshi.com/n/20160215/1563570.html" target="_blank">Photoshop调出时尚大气的海边婚纱人像效果</A></div>
                                    <div class="xiang_righ_lable">标签:<a href="https://www.tulaoshi.com/ps/" target="_blank">PS</a> <a href="https://www.tulaoshi.com/psjichu/" target="_blank">PS基础</a></div>
                         <div class="span_em_123"> 原图分析: 照片略欠偏灰相对保留的细节更多也给后期相对空间大一些注明:(并不是略欠照片就好调曝光适度就可以),摄影师从高角度去拍摄也让照片整体视觉感更强烈一些,远拍景的概念做的很好场面大气。 调修思路: 根据摄影师想表达的照片本身意境,后期进行一系列的强化。选择碧海蓝天色调对照片进行渲染,整个的色差高饱和,以艳丽为主给照片的视觉感强烈一些(后期%50摄影%50)后期尽量不要超过%50。修图师...<a href="https://www.tulaoshi.com/n/20160215/1563570.html" target="_blank">[ 查看全文 ]</a></div>
            <div class="span_em ">
              <div class="cai_list_font"><a href="/user/枪硬马子多晨熙/" target="_blank"><img src="https://static.tulaoshi.com/html/tulaoshi_new/images/touxiang/1.jpg" /><span>枪硬马子多晨熙</span></a></div>
              <span class="font_span"><a class="em_s" href="javascript:;">19</a><a class="em_s2" href="javascript:;">1</a></span></div>
          </div>
        </li>
                <li>
          <div class="xiang_892_2_1"><a href="/reader/1570871" target="_blank"><img src="https://img.tulaoshi.com/201602/16/732060a9ac77218e7ac88872de2d50c0_thumb_189.jpg" width="224" height="173"></a></div>
          <div class="xiang_right clearfix">
            <div class="xiang_right_1"><A href="https://www.tulaoshi.com/n/20160216/1570871.html" target="_blank">Illustrator绘制大气典雅的灯光背景效果图</A></div>
                                    <div class="xiang_righ_lable">标签:<a href="https://www.tulaoshi.com/illustrator/" target="_blank">Illustrator</a> <a href="https://www.tulaoshi.com/coreldraw/" target="_blank">CorelDRAW</a></div>
                         <div class="span_em_123"> 本教程主要使用Illustrator绘制大气典雅的灯光背景效果图,我们将学习如何快速绘制一个灯光背景。该教程将教你如何更好地使用基本形状工具和渐变,以制作出一个大气典雅的多彩背景图。下面就让我们一起来学习吧。 效果图: 1. 新建一个700*420的图层,矩形工具,新建一个如下图所示的矩形。 渐变设置如下图所示: 黑灰色 (R=54, G=57, B=66) and black (R=15, G=18, B=27) 黑色(R=15, G=18, B=27) ...<a href="https://www.tulaoshi.com/n/20160216/1570871.html" target="_blank">[ 查看全文 ]</a></div>
            <div class="span_em ">
              <div class="cai_list_font"><a href="/user/才子才女才气/" target="_blank"><img src="https://static.tulaoshi.com/html/tulaoshi_new/images/touxiang/11.jpg" /><span>才子才女才气</span></a></div>
              <span class="font_span"><a class="em_s" href="javascript:;">35</a><a class="em_s2" href="javascript:;">1</a></span></div>
          </div>
        </li>
                <li>
          <div class="xiang_892_2_1"><a href="/reader/1570949" target="_blank"><img src="https://img.tulaoshi.com/201602/16/71c0c87b09a4ce665dff6a880f82d698_thumb_189.jpg" width="224" height="173"></a></div>
          <div class="xiang_right clearfix">
            <div class="xiang_right_1"><A href="https://www.tulaoshi.com/n/20160216/1570949.html" target="_blank">Illustrator绘制时尚绚丽的花朵效果图</A></div>
                                    <div class="xiang_righ_lable">标签:<a href="https://www.tulaoshi.com/illustrator/" target="_blank">Illustrator</a> <a href="https://www.tulaoshi.com/coreldraw/" target="_blank">CorelDRAW</a></div>
                         <div class="span_em_123"> 我们先来看看最终的效果图吧: <a href="https://www.tulaoshi.com/n/20160216/1570949.html" target="_blank">[ 查看全文 ]</a></div>
            <div class="span_em ">
              <div class="cai_list_font"><a href="/user/泡吧火锅/" target="_blank"><img src="https://static.tulaoshi.com/html/tulaoshi_new/images/touxiang/29.jpg" /><span>泡吧火锅</span></a></div>
              <span class="font_span"><a class="em_s" href="javascript:;">10</a><a class="em_s2" href="javascript:;">1</a></span></div>
          </div>
        </li>
                <li>
          <div class="xiang_892_2_1"><a href="/reader/1467694" target="_blank"><img src="https://img.tulaoshi.com/201601/28/97dace58c508aa1e8c9e7e4d19f896c6_thumb_189.jpg" width="224" height="173"></a></div>
          <div class="xiang_right clearfix">
            <div class="xiang_right_1"><A href="https://www.tulaoshi.com/n/20160128/1467694.html" target="_blank">Illustrator轻松绘制矢量风格时尚插画</A></div>
                                    <div class="xiang_righ_lable">标签:<a href="https://www.tulaoshi.com/illustrator/" target="_blank">Illustrator</a></div>
                         <div class="span_em_123"> 在我很小的时候就与绘画结缘,直到在专业院校进行了五年的学习之后,才发现繁琐的制作过程几乎要磨灭我一切的想法。当一切的用品都备齐在你桌上的时候,你拿起笔却找不到下笔的位置,此时你满脑子都是:我应该如何避免和解决绘画过程中的突发事件。如果是这样,那你就很悲哀了,因为你已陷入了一个技术的误区。 有一段时间我一直徘徊在这样一个怪圈中,但有了电脑之后这一切就似乎不再是问...<a href="https://www.tulaoshi.com/n/20160128/1467694.html" target="_blank">[ 查看全文 ]</a></div>
            <div class="span_em ">
              <div class="cai_list_font"><a href="/user/创华业/" target="_blank"><img src="https://static.tulaoshi.com/html/tulaoshi_new/images/touxiang/4.jpg" /><span>创华业</span></a></div>
              <span class="font_span"><a class="em_s" href="javascript:;">14</a><a class="em_s2" href="javascript:;">1</a></span></div>
          </div>
        </li>
                <li>
          <div class="xiang_892_2_1"><a href="/reader/1467665" target="_blank"><img src="https://img.tulaoshi.com/201601/28/a09388368ead1c23755833366580211e_thumb_189.jpg" width="224" height="173"></a></div>
          <div class="xiang_right clearfix">
            <div class="xiang_right_1"><A href="https://www.tulaoshi.com/n/20160128/1467665.html" target="_blank">Illustrator绘制精细抽象效果壁纸</A></div>
                                    <div class="xiang_righ_lable">标签:<a href="https://www.tulaoshi.com/illustrator/" target="_blank">Illustrator</a></div>
                         <div class="span_em_123"> 今天我们用Illustrator来精心绘制一幅精细的抽象画桌面壁纸,最后完成图如下。 总体思路 由于作品图形复杂,所以图层管理和锁定、隐藏命令就显得非常重要。推荐把相关的图形分别置于各个图层中,并详细对图层命名,按住 Alt不放单击“锁定”按钮或“显示”按钮能够轻松锁定或隐藏其他图层,多使用Ctrl+2锁定和Ctrl+3隐藏命令,可以避免其他图形对操作的干扰,降低选择和操作的难度...<a href="https://www.tulaoshi.com/n/20160128/1467665.html" target="_blank">[ 查看全文 ]</a></div>
            <div class="span_em ">
              <div class="cai_list_font"><a href="/user/木哈买259/" target="_blank"><img src="https://static.tulaoshi.com/html/tulaoshi_new/images/touxiang/5.jpg" /><span>木哈买259</span></a></div>
              <span class="font_span"><a class="em_s" href="javascript:;">1</a><a class="em_s2" href="javascript:;">1</a></span></div>
          </div>
        </li>
                <li>
          <div class="xiang_892_2_1"><a href="/reader/1565182" target="_blank"><img src="https://img.tulaoshi.com/201602/15/ef0af67c6826ca293324ab7feb2eced4_thumb_189.jpg" width="224" height="173"></a></div>
          <div class="xiang_right clearfix">
            <div class="xiang_right_1"><A href="https://www.tulaoshi.com/n/20160215/1565182.html" target="_blank">Photoshop合成创意大气的烟雾人像效果</A></div>
                                    <div class="xiang_righ_lable">标签:<a href="https://www.tulaoshi.com/ps/" target="_blank">PS</a> <a href="https://www.tulaoshi.com/psjichu/" target="_blank">PS基础</a></div>
                         <div class="span_em_123"> 本教程主要使用Photoshop合成创意风格的烟雾人像效果,利用照亮边缘滤镜,把美女的轮廓线条提取出来 然后添加烟雾笔刷,通过蒙板把他们结合在一起。 教程素材: 合成绚丽的烟雾美女PS教程素材 作品效果: 局部大图 1、新建一个 800×1200画布 ,背景填充黑色 新建一个图层,然后渐变工具设置个渐变颜色,素材有我做好的渐变文件,可以直接载入或者是自己设置自己喜欢的颜色也可以。 ...<a href="https://www.tulaoshi.com/n/20160215/1565182.html" target="_blank">[ 查看全文 ]</a></div>
            <div class="span_em ">
              <div class="cai_list_font"><a href="/user/风暴团/" target="_blank"><img src="https://static.tulaoshi.com/html/tulaoshi_new/images/touxiang/22.jpg" /><span>风暴团</span></a></div>
              <span class="font_span"><a class="em_s" href="javascript:;">16</a><a class="em_s2" href="javascript:;">1</a></span></div>
          </div>
        </li>
                <li>
          <div class="xiang_892_2_1"><a href="/reader/1568180" target="_blank"><img src="https://img.tulaoshi.com/201602/16/ecac1a253494a906c2cc56ad0f736e9a_thumb_189.jpg" width="224" height="173"></a></div>
          <div class="xiang_right clearfix">
            <div class="xiang_right_1"><A href="https://www.tulaoshi.com/n/20160216/1568180.html" target="_blank">Photoshop调出大气的后期人像唯美效果</A></div>
                                    <div class="xiang_righ_lable">标签:<a href="https://www.tulaoshi.com/ps/" target="_blank">PS</a> <a href="https://www.tulaoshi.com/psjichu/" target="_blank">PS基础</a></div>
                         <div class="span_em_123"> 这组原本看似平淡的照片,经过设计师巧妙的快速调整,变得韵味十足。影楼后期设计强调的是创造美感,面对成百上千的原始照片,设计师如何快速地为照片调色,让照片焕然一新,本教程为我们提供了一些启示。 操作提示:修图时尽量减少不必要的环节,如磨皮时可以利用PS插件或滤镜来完成。快速调整色调需要设计师对色彩有足够的掌控能力,平时应多积累这方面的知识。 Neat Image Pro降噪软件,一款功能强大的...<a href="https://www.tulaoshi.com/n/20160216/1568180.html" target="_blank">[ 查看全文 ]</a></div>
            <div class="span_em ">
              <div class="cai_list_font"><a href="/user/775495845/" target="_blank"><img src="https://static.tulaoshi.com/html/tulaoshi_new/images/touxiang/20.jpg" /><span>775495845</span></a></div>
              <span class="font_span"><a class="em_s" href="javascript:;">3</a><a class="em_s2" href="javascript:;">1</a></span></div>
          </div>
        </li>
                <li>
          <div class="xiang_892_2_1"><a href="/reader/1570899" target="_blank"><img src="https://img.tulaoshi.com/201602/16/c5089ff63486c756a638827ac5c64844_thumb_189.jpg" width="224" height="173"></a></div>
          <div class="xiang_right clearfix">
            <div class="xiang_right_1"><A href="https://www.tulaoshi.com/n/20160216/1570899.html" target="_blank">Illustrator绘制逼真的立体苹果效果</A></div>
                                    <div class="xiang_righ_lable">标签:<a href="https://www.tulaoshi.com/illustrator/" target="_blank">Illustrator</a> <a href="https://www.tulaoshi.com/coreldraw/" target="_blank">CorelDRAW</a></div>
                         <div class="span_em_123"> 先看看效果图 下面是教程 <a href="https://www.tulaoshi.com/n/20160216/1570899.html" target="_blank">[ 查看全文 ]</a></div>
            <div class="span_em ">
              <div class="cai_list_font"><a href="/user/小二美瞳仓库/" target="_blank"><img src="https://static.tulaoshi.com/html/tulaoshi_new/images/touxiang/9.jpg" /><span>小二美瞳仓库</span></a></div>
              <span class="font_span"><a class="em_s" href="javascript:;">77</a><a class="em_s2" href="javascript:;">1</a></span></div>
          </div>
        </li>
                <li>
          <div class="xiang_892_2_1"><a href="/reader/1570557" target="_blank"><img src="https://img.tulaoshi.com/201602/16/2ace79b5e7daf0af2c061ec7440da115_thumb_189.jpg" width="224" height="173"></a></div>
          <div class="xiang_right clearfix">
            <div class="xiang_right_1"><A href="https://www.tulaoshi.com/n/20160216/1570557.html" target="_blank">Illustrator制作时尚的毛线编织效果教程</A></div>
                                    <div class="xiang_righ_lable">标签:<a href="https://www.tulaoshi.com/illustrator/" target="_blank">Illustrator</a> <a href="https://www.tulaoshi.com/coreldraw/" target="_blank">CorelDRAW</a></div>
                         <div class="span_em_123"> 下面是教程 1.打开AI软件,新建一个文档,我在文档里准备了这些元素,如下图: 2.我这里参考原来的形状来画,凡是有规则对称的形状,都可以先画好一半再镜向出另一半来的绘制;这种方法都是很常用。 3.画好了一个形状后,按ALT键用鼠标拖动的方法复制出另一个对象,然后按CTRL+D进行重复复制粘贴,如下图 4.接着执行对象--拓展,选中所有编织形状对象再执行路径查找器联集,最后执行效果--...<a href="https://www.tulaoshi.com/n/20160216/1570557.html" target="_blank">[ 查看全文 ]</a></div>
            <div class="span_em ">
              <div class="cai_list_font"><a href="/user/刘艺曦/" target="_blank"><img src="https://static.tulaoshi.com/html/tulaoshi_new/images/touxiang/27.jpg" /><span>刘艺曦</span></a></div>
              <span class="font_span"><a class="em_s" href="javascript:;">82</a><a class="em_s2" href="javascript:;">1</a></span></div>
          </div>
        </li>
                <li>
          <div class="xiang_892_2_1"><a href="/reader/1466920" target="_blank"><img src="https://img.tulaoshi.com/201601/28/79dd508793973fb08db6ea8d9f4a5310_thumb_189.jpg" width="224" height="173"></a></div>
          <div class="xiang_right clearfix">
            <div class="xiang_right_1"><A href="https://www.tulaoshi.com/n/20160128/1466920.html" target="_blank">AI教程!手把手教你绘制波普艺术风格人像</A></div>
                                    <div class="xiang_righ_lable">标签:<a href="https://www.tulaoshi.com/illustrator/" target="_blank">Illustrator</a></div>
                         <div class="span_em_123"> 波普艺术鼎盛于50年代中期的美国,也被称为流行艺术、通俗艺术。在这一艺术风格的影响下,作为创作灵感的来源,可以在对肖像创作上下一番功夫,将人像转而绘制成波普风插图,在此基础上再来制作出新颖别致的波普风格的海报、插画甚至是包装设计、封面设计等平面作品。 波普风最大的特点是用色大胆鲜艳,并且善用对比。有时还会选择圆点等纹理图案作为点缀。 我们今天要学习的是利用AI来绘制波普艺术风格...<a href="https://www.tulaoshi.com/n/20160128/1466920.html" target="_blank">[ 查看全文 ]</a></div>
            <div class="span_em ">
              <div class="cai_list_font"><a href="/user/小乡村_村长/" target="_blank"><img src="https://static.tulaoshi.com/html/tulaoshi_new/images/touxiang/10.jpg" /><span>小乡村_村长</span></a></div>
              <span class="font_span"><a class="em_s" href="javascript:;">744</a><a class="em_s2" href="javascript:;">1</a></span></div>
          </div>
        </li>
                <li>
          <div class="xiang_892_2_1"><a href="/reader/1563426" target="_blank"><img src="https://img.tulaoshi.com/201602/15/12fc9d00e2093605929a7a978d2aa119_thumb_189.jpg" width="224" height="173"></a></div>
          <div class="xiang_right clearfix">
            <div class="xiang_right_1"><A href="https://www.tulaoshi.com/n/20160215/1563426.html" target="_blank">Photoshop绘制时尚大气的3D立体字教程</A></div>
                                    <div class="xiang_righ_lable">标签:<a href="https://www.tulaoshi.com/ps/" target="_blank">PS</a> <a href="https://www.tulaoshi.com/psjichu/" target="_blank">PS基础</a></div>
                         <div class="span_em_123"> 本教程主要使用Photoshop制作3D绚丽的立体字教程,立体很容易做好,不过要能与场景完美融合,还需要一些特殊处理。如下面的教程:立体字做好后,作者根据背景、光源、质感等重新给立体字的各个面进行细化处理,出来的效果非常整体,细腻。 最终效果 1、这里的逻辑是,先得到一个符合透视原理的3D文字轮廓然后放到photoshop中添加贴图和效果,做成艺术化的伪3D视觉。得到3D轮廓的方法很多,比如绘画基础...<a href="https://www.tulaoshi.com/n/20160215/1563426.html" target="_blank">[ 查看全文 ]</a></div>
            <div class="span_em ">
              <div class="cai_list_font"><a href="/user/Kangyaozhen66/" target="_blank"><img src="https://static.tulaoshi.com/html/tulaoshi_new/images/touxiang/6.jpg" /><span>Kangyaozhen66</span></a></div>
              <span class="font_span"><a class="em_s" href="javascript:;">9</a><a class="em_s2" href="javascript:;">1</a></span></div>
          </div>
        </li>
                <li>
          <div class="xiang_892_2_1"><a href="/reader/1467169" target="_blank"><img src="https://img.tulaoshi.com/201601/28/a0aee5533d5cff23dd263b2b9765c1b2_thumb_189.jpg" width="224" height="173"></a></div>
          <div class="xiang_right clearfix">
            <div class="xiang_right_1"><A href="https://www.tulaoshi.com/n/20160128/1467169.html" target="_blank">Illustrator教程:教你绘制彩色半调效果</A></div>
                                    <div class="xiang_righ_lable">标签:<a href="https://www.tulaoshi.com/illustrator/" target="_blank">Illustrator</a></div>
                         <div class="span_em_123"> 在AI中绘制彩色半调效果[实用推荐] 适用版本:AICS2及以上 画个圆形(也可自定形状),以任何方式得到四周白色到中心灰色的渐变(灰色不可太黑,越黑,最终点越大) 栅格化为位图 栅格化的位图运行彩色半调 运行"彩色半调"效果后的位图进行"实时描摹" [next] 再扩展 解散[ 查看全文 ]

  • 标签:PS PS基础
    本文介绍三种视觉海报的制作方法,这些海报都具有不错的视觉效果,能够吸引不少人的眼球,没有太多的花俏,简单的线条以及颜色搭配,就能够释放夺人视线的效果。 先看一些网上搜集的效果图: 本例的效果图: 1、添加渐变-径向渐变,取色随意,图片大小自定义。 2、打开素材图片,调节图片大小,钢笔勾出双三角图形,转换选取,复制图层。 3、再拷贝一个三角形图层,复制。 4、...[ 查看全文 ]
  • 标签:PS PS基础
    效果图: 步骤1 - 创建一个新的文件宽度和高度。 第2步 - 打开模型形象,放在我们的文件中。 第3步 - 现在创建一个新层,改变混合模式为颜色。用前景色#34ff2b,选择一个软轮刷,并用它在嘴唇和眼睛。 第4步 - 创建另一个层和改变你再次混合模式为颜色。现在,选择不同的颜色和使用颜色的头发。 第5步 - 现在选择软轮刷下使用眼睛颜色#000000。 第6步 - 现在选择上述一个星星刷和...[ 查看全文 ]
  • 标签:PS PS基础
    完成的效果图: 下面我们就来讲解这个是怎么做的, 1.创建一个新的文档,填充黑色, 2.创建一个新图层,用画笔工具,0%的硬度,选择橙色 3.然后高斯模糊,数值20(根据图片而定) 4.再创建一个图层,执行滤镜----渲染----云彩 5.改变混合模式为柔光 6.打开一张人物图,把人物抠出来. 7.抠好的图裁剪过来,调整成这样 8.在混合模式里 9.然后,再新建渐变映射,混合模式为柔光,不透...[ 查看全文 ]
  • 标签:PS PS基础
    一直和喜欢玻璃的质感,所以临摹了kissmiklos的一款酒设计,制作了这样一款颜色鲜丽的水果酒瓶,内含PS源文件,希望大家喜欢。 教程源文件: 时尚立体效果的酒瓶PS教程源文件 下面是效果图 这是最终成品,酒瓶分为瓶身包装、瓶颈包装、玻璃瓶体和标签几个部分。 首先我们建立一张画布 给画布上个底色 用钢笔工具【P】勾出整个酒瓶的轮廓,有对称强迫症的童鞋可以先制作半边,再镜像复制另...[ 查看全文 ]
  • 这篇AI绘制超强质感闹钟教程是我刚刚学习过的,教程的原创作者是greatltt,这里要先感谢greatltt的原创分享。作者绘制出来的闹钟,质感的表现非常强。AI的颜色运用非常到位了,推荐给图老师的朋友们,一起分享一起学习。 我们先来看看最终的效果图吧: 组合起来之后,闹钟就出现了! 背景、投影、倒影等 大家自己添加吧!~下面补充一个表针盘用锥形渐变制作的手法! ...[ 查看全文 ]
  • 标签:PS PS基础
    最终效果 1、新建一个800 * 800像素,分辨率为72的画布。选择渐变工具,颜色设置为黑白,然后由中心向边角拉出下图所示的径向渐变。 2、现在来制作球体部分,需要完成的效果如下图。 3、新建一个组,选择椭圆选框工具,按住Shift键拉一个正圆选区,然后给组添加图层蒙版。 4、在组里新建一个图层,选择渐变工具,颜色设置如图4,然后由球体的右上方向下拉出图5所示的径向渐变。 5、新...[ 查看全文 ]
  • 有同学看到这类字体效果后想知道绘制方法,刘远航给出了一个简单高效,上手即用的操作方法,通过巧用路径混合工具轻松搞定,特别涨姿势的一个教程。 效果图: 示例: 这个你会画吧?(还是好多童鞋不会,最后有补充这个饼图的画法) 画一个S形路径,然后首尾各一个 然后选中两个圆形 上面菜单。对象混合建立。调整一下混合选项 我这里选择的是指定距离0.1mm,看起来很连贯了,这就ok。 然后我...[ 查看全文 ]
  • 上一页225532255422555225562255722558225592256022561下一页
    手机页面
    收藏网站 回到头部