Photoshop设计喷溅效果的老虎海报教程
本教程中我们利用Photoshop制作一只迷幻神奇的老虎,主要是利用渐变和绘画技巧等来制作出海报的生动画面效果。
最终效果
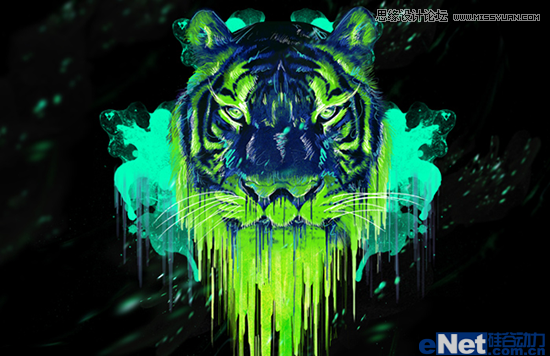
1.创建一个新的文档,并如下图设置,将背景填充为黑色
图1
2.下载一张"老虎"图片,寻找那种虎头正面的图片,然后使用钢笔工具将其面部抠选下来
![Photos...<a href="http://www.tulaoshi.com/n/20160216/1567206.html" target="_blank">[ 查看全文 ]</a></p>
<div class="img_yyy_2">
<span>2016-02-16</span>
<i>标签:</i>
<div class="yyy_2_a"><a href="http://www.tulaoshi.com/ps/" target="_blank">PS</a> <a href="http://www.tulaoshi.com/psjichu/" target="_blank">PS基础</a></div>
</div>
</div>
</div>
</div>
<div class="xiangguan_gg xiangguan_reader clearfix">
<div class="xiang_892_1" style="width:1158px;">
<h3><a href="http://www.tulaoshi.com/n/20160216/1567206.html" target="_blank">Photoshop设计喷溅效果的老虎海报教程</a>的相关文章</h3>
</div>
<div class="xiang_892_2" style="width:1158px;">
<ul id="loadmore_container" style="width:1158px;">
<li>
<div class="xiang_892_2_1"><a href="/reader/1563833" target="_blank"><img src="http://img.tulaoshi.com/201602/15/b31db26f91536587ecc9ffda4675c35a_thumb_189.jpg" width="224" height="173"></a></div>
<div class="xiang_right clearfix">
<div class="xiang_right_1"><A href="http://www.tulaoshi.com/n/20160215/1563833.html" target="_blank">Photoshop设计创意喷溅效果的运动鞋海报</A></div>
<div class="xiang_righ_lable">标签:<a href="http://www.tulaoshi.com/ps/" target="_blank">PS</a> <a href="http://www.tulaoshi.com/psjichu/" target="_blank">PS基础</a></div>
<div class="span_em_123"> 本教程主要使用Photoshop设计油漆喷溅效果的运动鞋海报,整体的运动鞋广告设计非常的漂亮,喜欢的朋友让我们一起来学习吧。 教程所需要的素材: 喷溅效果运动鞋广告设计PS教程素材 <a href="http://www.tulaoshi.com/n/20160215/1563833.html" target="_blank">[ 查看全文 ]</a></div>
<div class="span_em ">
<div class="cai_list_font"><a href="/user/霸天嚣张的活着/" target="_blank"><img src="http://static.tulaoshi.com/html/tulaoshi_new/images/touxiang/23.jpg" /><span>霸天嚣张的活着</span></a></div>
<span class="font_span"><a class="em_s" href="javascript:;">17</a><a class="em_s2" href="javascript:;">1</a></span></div>
</div>
</li>
<li>
<div class="xiang_892_2_1"><a href="/reader/1563579" target="_blank"><img src="http://img.tulaoshi.com/201602/15/af6635353683fb7657c61d16bb6c0630_thumb_189.jpg" width="224" height="173"></a></div>
<div class="xiang_right clearfix">
<div class="xiang_right_1"><A href="http://www.tulaoshi.com/n/20160215/1563579.html" target="_blank">Photoshop合成复古喷溅效果的人像海报教程</A></div>
<div class="xiang_righ_lable">标签:<a href="http://www.tulaoshi.com/ps/" target="_blank">PS</a> <a href="http://www.tulaoshi.com/psjichu/" target="_blank">PS基础</a></div>
<div class="span_em_123"> 本教程主要使用Photoshop合成墨迹喷溅效果的复古人像效果,效果图非常有个性,制作过程也简单。思路:先用滤镜提取人物的一些轮廓线条,并加好合适的背景色;然后用阈值把人像转为想要的黑白效果,再更改混合模式得到初步的效果;后期增加一些喷溅效果,并加上文案等即可。 教程素材和源文件: 复古风格的喷溅人像海报PS教程素材 最终效果 1、新建合适大小画布,打开人物图片,剪裁合适区域,布满画...<a href="http://www.tulaoshi.com/n/20160215/1563579.html" target="_blank">[ 查看全文 ]</a></div>
<div class="span_em ">
<div class="cai_list_font"><a href="/user/小阿雪994/" target="_blank"><img src="http://static.tulaoshi.com/html/tulaoshi_new/images/touxiang/9.jpg" /><span>小阿雪994</span></a></div>
<span class="font_span"><a class="em_s" href="javascript:;">31</a><a class="em_s2" href="javascript:;">1</a></span></div>
</div>
</li>
<li>
<div class="xiang_892_2_1"><a href="/reader/1564066" target="_blank"><img src="http://img.tulaoshi.com/201602/15/47c64fa0501860f6afd93c4e4e35eaa2_thumb_189.jpg" width="224" height="173"></a></div>
<div class="xiang_right clearfix">
<div class="xiang_right_1"><A href="http://www.tulaoshi.com/n/20160215/1564066.html" target="_blank">Photoshop制作锈迹喷溅效果的人像海报</A></div>
<div class="xiang_righ_lable">标签:<a href="http://www.tulaoshi.com/ps/" target="_blank">PS</a> <a href="http://www.tulaoshi.com/psjichu/" target="_blank">PS基础</a></div>
<div class="span_em_123"> 本教程主要使用Photoshop制作锈迹喷溅效果的人像海报,今天这类效果很受欢迎,想会的同学别放过咯。先讲一下思路:拿到素材人物后简单调色,把暗部用水彩质感的素材替换掉即可。具体操作直接右戳。 先看看效果图 素材人物,咱找个美女吧。 1.如果素材不是白底需要抠图,略去不说,复制一层,去色。 观察一下因为我们要实现的效果有点类似绘画,所以需要对比度大一些,调整曲线尽量使中间色调少...<a href="http://www.tulaoshi.com/n/20160215/1564066.html" target="_blank">[ 查看全文 ]</a></div>
<div class="span_em ">
<div class="cai_list_font"><a href="/user/谁奈吾何/" target="_blank"><img src="http://static.tulaoshi.com/html/tulaoshi_new/images/touxiang/16.jpg" /><span>谁奈吾何</span></a></div>
<span class="font_span"><a class="em_s" href="javascript:;">28</a><a class="em_s2" href="javascript:;">1</a></span></div>
</div>
</li>
<li>
<div class="xiang_892_2_1"><a href="/reader/1524033" target="_blank"><img src="http://img.tulaoshi.com/201601/31/99d963bc1459fa162b16601b0adbed58_thumb_189.jpg" width="224" height="173"></a></div>
<div class="xiang_right clearfix">
<div class="xiang_right_1"><A href="http://www.tulaoshi.com/n/20160131/1524033.html" target="_blank">Photoshop打造动感喷溅人物海报</A></div>
<div class="xiang_righ_lable">标签:<a href="http://www.tulaoshi.com/psxpcl/" target="_blank">PS相片处理</a> <a href="http://www.tulaoshi.com/psjichu/" target="_blank">PS基础</a> <a href="http://www.tulaoshi.com/ps/" target="_blank">PS</a> <a href="http://www.tulaoshi.com/psxg/" target="_blank">PS效果</a></div>
<div class="span_em_123"> 潮流海报实际制作过程不复杂,关键是创意。有了好的想法,然后用自己娴熟的技巧去表达,很容易做出非常有艺术效果的图片。 最终效果 1、打开人物图片。 2、创建一个新的层(fhift+Ctrl + N)和名称是"身体油漆”。将图层混合模式为正片叠底。 3、开始用笔刷画人物的脸和左手臂 选择笔刷工具,先选择一个软圆刷。设置您喜欢的大小。设置前景色为# fff200。 4、现在我们...<a href="http://www.tulaoshi.com/n/20160131/1524033.html" target="_blank">[ 查看全文 ]</a></div>
<div class="span_em ">
<div class="cai_list_font"><a href="/user/孙哈眼/" target="_blank"><img src="http://static.tulaoshi.com/html/tulaoshi_new/images/touxiang/3.jpg" /><span>孙哈眼</span></a></div>
<span class="font_span"><a class="em_s" href="javascript:;">53</a><a class="em_s2" href="javascript:;">1</a></span></div>
</div>
</li>
<li>
<div class="xiang_892_2_1"><a href="/reader/1497630" target="_blank"><img src="http://img.tulaoshi.com/201601/29/f6cf5621ca9abd528054446e6381d115_thumb_189.jpg" width="224" height="173"></a></div>
<div class="xiang_right clearfix">
<div class="xiang_right_1"><A href="http://www.tulaoshi.com/n/20160129/1497630.html" target="_blank">Photoshop教程:制作旋转玫瑰喷溅裙子美女海报</A></div>
<div class="xiang_righ_lable">标签:<a href="http://www.tulaoshi.com/ps/" target="_blank">PS</a> <a href="http://www.tulaoshi.com/psjiaocheng/" target="_blank">PS教程</a></div>
<div class="span_em_123"> 流体效果比较常用,如下面的效果,作者找一副比较动感的人物图片,然后在衣服边缘增加一些流体,再配上一些几何图形及黑白背景,时尚大气,张力十足。 最终效果 1、打开人物图片,利用矩形选框工具将文件放大到要求大小。 2、打开星空素材,拖到人物图层上面,混合模式改为“柔光”,不透明度改为:40%。 3、打开高光素材,拖到星空图层上面,混合模式改为“滤色”。 ...<a href="http://www.tulaoshi.com/n/20160129/1497630.html" target="_blank">[ 查看全文 ]</a></div>
<div class="span_em ">
<div class="cai_list_font"><a href="/user/微信760006804/" target="_blank"><img src="http://static.tulaoshi.com/html/tulaoshi_new/images/touxiang/1.jpg" /><span>微信760006804</span></a></div>
<span class="font_span"><a class="em_s" href="javascript:;">34</a><a class="em_s2" href="javascript:;">1</a></span></div>
</div>
</li>
<li>
<div class="xiang_892_2_1"><a href="/reader/1566831" target="_blank"><img src="http://img.tulaoshi.com/201602/16/28422b9834456fa8af8c3759c7705aad_thumb_189.jpg" width="224" height="173"></a></div>
<div class="xiang_right clearfix">
<div class="xiang_right_1"><A href="http://www.tulaoshi.com/n/20160216/1566831.html" target="_blank">Photoshop设计时尚喷溅效果的运动鞋</A></div>
<div class="xiang_righ_lable">标签:<a href="http://www.tulaoshi.com/ps/" target="_blank">PS</a> <a href="http://www.tulaoshi.com/psjichu/" target="_blank">PS基础</a></div>
<div class="span_em_123"> 最终效果 1、新建1289*1000px大小的文档,编辑填充颜色#adadad。 2、打开背景素材,拉入文档中,ctrl+T变换大小摆放好位置。执行调整--黑白(去色),将图层模式改为叠加,不透明度24%。 3、复制一层背景素材,改模式为正常。ctrl+T变换,将图层进行向下压缩。 4、添加图层蒙版,将上面边缘擦拭一下,使其和背景融合起来,做出地板的效果。 5、新建图层阴影,改不透明度无11%。用黑色...<a href="http://www.tulaoshi.com/n/20160216/1566831.html" target="_blank">[ 查看全文 ]</a></div>
<div class="span_em ">
<div class="cai_list_font"><a href="/user/xcc160/" target="_blank"><img src="http://static.tulaoshi.com/html/tulaoshi_new/images/touxiang/21.jpg" /><span>xcc160</span></a></div>
<span class="font_span"><a class="em_s" href="javascript:;">19</a><a class="em_s2" href="javascript:;">1</a></span></div>
</div>
</li>
<li>
<div class="xiang_892_2_1"><a href="/reader/1566894" target="_blank"><img src="http://img.tulaoshi.com/201602/16/88bc23e2946f711eed8895b4f764ec71_thumb_189.jpg" width="224" height="173"></a></div>
<div class="xiang_right clearfix">
<div class="xiang_right_1"><A href="http://www.tulaoshi.com/n/20160216/1566894.html" target="_blank">Photoshop设计绚丽光线效果的美女海报</A></div>
<div class="xiang_righ_lable">标签:<a href="http://www.tulaoshi.com/ps/" target="_blank">PS</a> <a href="http://www.tulaoshi.com/psjichu/" target="_blank">PS基础</a></div>
<div class="span_em_123"> 最终效果 1、打开photoshop新建一个550 * 1100像素的文件。选择渐变工具,设置渐变颜色# 0f0f0e至# 010102,选择径向渐变,在画布从上到下绘制渐变。 新建一个图层命名为颜色,用渐变选择色谱默认选项,从上至下绘制一个渐变,然后将图层的混合模式设置为颜色。给颜色图层添加图层蒙版,设置径向渐变的颜色从白色到黑色,然后绘制一个渐变。 2、选择图案图章工具如下图绘制线条(点这里下载抽丝图案)...<a href="http://www.tulaoshi.com/n/20160216/1566894.html" target="_blank">[ 查看全文 ]</a></div>
<div class="span_em ">
<div class="cai_list_font"><a href="/user/1230000632/" target="_blank"><img src="http://static.tulaoshi.com/html/tulaoshi_new/images/touxiang/24.jpg" /><span>1230000632</span></a></div>
<span class="font_span"><a class="em_s" href="javascript:;">15</a><a class="em_s2" href="javascript:;">1</a></span></div>
</div>
</li>
<li>
<div class="xiang_892_2_1"><a href="/reader/1479355" target="_blank"><img src="http://img.tulaoshi.com/201601/29/ec23e2210717b098dca1660175c7e7c3_thumb_189.jpg" width="224" height="173"></a></div>
<div class="xiang_right clearfix">
<div class="xiang_right_1"><A href="http://www.tulaoshi.com/n/20160129/1479355.html" target="_blank">Photoshop设计创意美食海报教程</A></div>
<div class="xiang_righ_lable">标签:<a href="http://www.tulaoshi.com/ps/" target="_blank">PS</a> <a href="http://www.tulaoshi.com/psjiaocheng/" target="_blank">PS教程</a></div>
<div class="span_em_123">美食海报要体现食欲,所以颜色的搭配很重要。蓝色会让人没有食欲,它的对比色橙色会刺激食欲,所以食品海报用橙色的比较多。用第一人称视角的形式表现也会让画面更有代入感。 最终效果 用到的素材下载:http://yunpan.cn/c3YdFcnGXWSE5 访问密码 a69e 一、头脑风暴: 头脑风暴是为了提炼关键词找素材,这次我们做的是美食海报,所以我们围绕美食来发散思维。 二、寻找灵感: 找寻灵感...<a href="http://www.tulaoshi.com/n/20160129/1479355.html" target="_blank">[ 查看全文 ]</a></div>
<div class="span_em ">
<div class="cai_list_font"><a href="/user/qq1006661/" target="_blank"><img src="http://static.tulaoshi.com/html/tulaoshi_new/images/touxiang/25.jpg" /><span>qq1006661</span></a></div>
<span class="font_span"><a class="em_s" href="javascript:;">13</a><a class="em_s2" href="javascript:;">1</a></span></div>
</div>
</li>
<li>
<div class="xiang_892_2_1"><a href="/reader/1564584" target="_blank"><img src="http://img.tulaoshi.com/201602/15/28afa5e881a65ec1cb84718e1e366849_thumb_189.jpg" width="224" height="173"></a></div>
<div class="xiang_right clearfix">
<div class="xiang_right_1"><A href="http://www.tulaoshi.com/n/20160215/1564584.html" target="_blank">Photoshop设计超酷的2018海报教程</A></div>
<div class="xiang_righ_lable">标签:<a href="http://www.tulaoshi.com/ps/" target="_blank">PS</a> <a href="http://www.tulaoshi.com/psjichu/" target="_blank">PS基础</a></div>
<div class="span_em_123"> 本文教大家用现有的图片素材打造一张2015年的海报教程 , 这次的难度并不大,素材基本是现成的,以调色为主,不会很难。喜欢的朋友一起来学习吧。 效果图: 素材: 首先打开主体的素材,右侧能看到有一些奇怪的外文,先把它搞掉。 先把背景复制一层,是个不错的习惯。用污点修复工具在文字上刷两下去掉主体。 一些瑕疵再用工具修复下。 不满意的地方可以用仿制图章修复,看一下...<a href="http://www.tulaoshi.com/n/20160215/1564584.html" target="_blank">[ 查看全文 ]</a></div>
<div class="span_em ">
<div class="cai_list_font"><a href="/user/饮鸩不止渴123/" target="_blank"><img src="http://static.tulaoshi.com/html/tulaoshi_new/images/touxiang/24.jpg" /><span>饮鸩不止渴123</span></a></div>
<span class="font_span"><a class="em_s" href="javascript:;">2</a><a class="em_s2" href="javascript:;">1</a></span></div>
</div>
</li>
<li>
<div class="xiang_892_2_1"><a href="/reader/1564811" target="_blank"><img src="http://img.tulaoshi.com/201602/15/38baba9ea4d3ac5586466a70df4e7117_thumb_189.jpg" width="224" height="173"></a></div>
<div class="xiang_right clearfix">
<div class="xiang_right_1"><A href="http://www.tulaoshi.com/n/20160215/1564811.html" target="_blank">Photoshop设计剪影风格颓废海报效果</A></div>
<div class="xiang_righ_lable">标签:<a href="http://www.tulaoshi.com/ps/" target="_blank">PS</a> <a href="http://www.tulaoshi.com/psjichu/" target="_blank">PS基础</a></div>
<div class="span_em_123"> 最终效果 1、首先,我们来新建文件。这里我们需要设置长、宽还有分辨率。在我们的例子中,我打算使用A5的纸张大小,选择国际标准纸张,然后选择A5大小,分辨率则选择300DPI为了打印出来的图片足够清晰。 2、现在文件就创建好了,我们首先来创建合适的背景。在我们的例子中,图片的上半部分是比较亮的颜色,而下半部分则比较灰暗,这将有助于我们创建剪影效果。首先,我们新建一个图层(快捷键为Ctrl +...<a href="http://www.tulaoshi.com/n/20160215/1564811.html" target="_blank">[ 查看全文 ]</a></div>
<div class="span_em ">
<div class="cai_list_font"><a href="/user/恺撒gx20/" target="_blank"><img src="http://static.tulaoshi.com/html/tulaoshi_new/images/touxiang/11.jpg" /><span>恺撒gx20</span></a></div>
<span class="font_span"><a class="em_s" href="javascript:;">5</a><a class="em_s2" href="javascript:;">1</a></span></div>
</div>
</li>
<li>
<div class="xiang_892_2_1"><a href="/reader/1566189" target="_blank"><img src="http://img.tulaoshi.com/201602/16/d6f688fc8201f147b817f35913b77f4d_thumb_189.jpg" width="224" height="173"></a></div>
<div class="xiang_right clearfix">
<div class="xiang_right_1"><A href="http://www.tulaoshi.com/n/20160216/1566189.html" target="_blank">Photoshop设计绚丽梦幻效果的双心海报</A></div>
<div class="xiang_righ_lable">标签:<a href="http://www.tulaoshi.com/ps/" target="_blank">PS</a> <a href="http://www.tulaoshi.com/psjichu/" target="_blank">PS基础</a></div>
<div class="span_em_123"> 今天PS梦工场为大家带来一个非常浪漫的教程在Photoshop中创建浪漫的抽象心形。教程中使用到形状与路径的编辑以及图层不透明度的设置。整个教程并没有什么难度,只要你有耐心,相信你肯定会做成不错的效果。 先看看效果图 第1步: 打开Photoshop,Ctrl+N新建一个文档,设置尺寸为1280×1024像素,RGB模式。按住Alt键双击背景图层,将其转换为普通图层。继续双击图层,为其添加渐变叠加样式,CS6...<a href="http://www.tulaoshi.com/n/20160216/1566189.html" target="_blank">[ 查看全文 ]</a></div>
<div class="span_em ">
<div class="cai_list_font"><a href="/user/河渠智俑/" target="_blank"><img src="http://static.tulaoshi.com/html/tulaoshi_new/images/touxiang/9.jpg" /><span>河渠智俑</span></a></div>
<span class="font_span"><a class="em_s" href="javascript:;">13</a><a class="em_s2" href="javascript:;">1</a></span></div>
</div>
</li>
<li>
<div class="xiang_892_2_1"><a href="/reader/1566450" target="_blank"><img src="http://img.tulaoshi.com/201602/16/3224cf17e7951bde27363e9714074dd8_thumb_189.jpg" width="224" height="173"></a></div>
<div class="xiang_right clearfix">
<div class="xiang_right_1"><A href="http://www.tulaoshi.com/n/20160216/1566450.html" target="_blank">Photoshop设计金属颓废效果的海报标题字</A></div>
<div class="xiang_righ_lable">标签:<a href="http://www.tulaoshi.com/ps/" target="_blank">PS</a> <a href="http://www.tulaoshi.com/psjichu/" target="_blank">PS基础</a></div>
<div class="span_em_123"> <a href="http://www.tulaoshi.com/n/20160216/1566450.html" target="_blank">[ 查看全文 ]</a></div>
<div class="span_em ">
<div class="cai_list_font"><a href="/user/任大代表gg/" target="_blank"><img src="http://static.tulaoshi.com/html/tulaoshi_new/images/touxiang/1.jpg" /><span>任大代表gg</span></a></div>
<span class="font_span"><a class="em_s" href="javascript:;">4</a><a class="em_s2" href="javascript:;">1</a></span></div>
</div>
</li>
<li>
<div class="xiang_892_2_1"><a href="/reader/1564067" target="_blank"><img src="http://img.tulaoshi.com/201602/15/112e20e23ae96395945393ccaad048ac_thumb_189.jpg" width="224" height="173"></a></div>
<div class="xiang_right clearfix">
<div class="xiang_right_1"><A href="http://www.tulaoshi.com/n/20160215/1564067.html" target="_blank">Photoshop制作喷溅效果的黑寡妇照片</A></div>
<div class="xiang_righ_lable">标签:<a href="http://www.tulaoshi.com/ps/" target="_blank">PS</a> <a href="http://www.tulaoshi.com/psjichu/" target="_blank">PS基础</a></div>
<div class="span_em_123"> 原图 1、打开人物素材。 2、如果素材不是白底需要抠图,略去不说,复制一层,去色。 3、观察一下因为我们要实现的效果有点类似绘画,所以需要对比度大一些,调整曲线尽量使中间色调少一些,明暗的区分明显点,调的像下面这个就差不多了。 4、开始堆素材。 5、就是这些,直接一块一块的截图往图片上做正片叠底,老实说这一步做的时候,如果不较真并不需要注意太多内容,唯...<a href="http://www.tulaoshi.com/n/20160215/1564067.html" target="_blank">[ 查看全文 ]</a></div>
<div class="span_em ">
<div class="cai_list_font"><a href="/user/梦里属于谁/" target="_blank"><img src="http://static.tulaoshi.com/html/tulaoshi_new/images/touxiang/17.jpg" /><span>梦里属于谁</span></a></div>
<span class="font_span"><a class="em_s" href="javascript:;">25</a><a class="em_s2" href="javascript:;">1</a></span></div>
</div>
</li>
<li>
<div class="xiang_892_2_1"><a href="/reader/1564016" target="_blank"><img src="http://img.tulaoshi.com/201602/15/c4f28ffa768b8d23dac464f7a9767f3a_thumb_189.jpg" width="224" height="173"></a></div>
<div class="xiang_right clearfix">
<div class="xiang_right_1"><A href="http://www.tulaoshi.com/n/20160215/1564016.html" target="_blank">Photoshop设计创意的产品宣传海报教程</A></div>
<div class="xiang_righ_lable">标签:<a href="http://www.tulaoshi.com/ps/" target="_blank">PS</a> <a href="http://www.tulaoshi.com/psjichu/" target="_blank">PS基础</a></div>
<div class="span_em_123"> 先看看效果 这就是原图了,做的很简单,大家一看就知道是新手对的吧,于是我要来了产品拍摄图 是这样的,我们先把产品抠图,记住用钢笔抠图,面试都是钢笔抠图的,魔棒什么的最好不用,业界一句话,用钢笔抠图是对产品的基本尊重。 这一步大家都是会的,我想既然是推车,我在工厂也见过,其实我还推过货的,这东西就是个质量和载重,那怎么体现载重呢?我就在想了!放个数字,太单调了,我想呀...<a href="http://www.tulaoshi.com/n/20160215/1564016.html" target="_blank">[ 查看全文 ]</a></div>
<div class="span_em ">
<div class="cai_list_font"><a href="/user/许106106/" target="_blank"><img src="http://static.tulaoshi.com/html/tulaoshi_new/images/touxiang/26.jpg" /><span>许106106</span></a></div>
<span class="font_span"><a class="em_s" href="javascript:;">48</a><a class="em_s2" href="javascript:;">1</a></span></div>
</div>
</li>
<li>
<div class="xiang_892_2_1"><a href="/reader/1563823" target="_blank"><img src="http://img.tulaoshi.com/201602/15/58543fe21d0229292d7c41ce99a00a3d_thumb_189.jpg" width="224" height="173"></a></div>
<div class="xiang_right clearfix">
<div class="xiang_right_1"><A href="http://www.tulaoshi.com/n/20160215/1563823.html" target="_blank">Photoshop设计折纸风格的字体海报教程</A></div>
<div class="xiang_righ_lable">标签:<a href="http://www.tulaoshi.com/ps/" target="_blank">PS</a> <a href="http://www.tulaoshi.com/psjichu/" target="_blank">PS基础</a></div>
<div class="span_em_123"> 今天的海报设计以文字为主,不乏趣味,刺激阅读。有同学问这类效果能不能用PS作,P大点S微博试着撸了出来,下面讲一下过程。方法千千万万种,条条道路通罗马,这里要带出套索工具的一些实战使用技巧。文末还有关于套索工具和调色命令组合技的小灶,真心好用哭。 结果终稿: 这里附上原稿: 第一步:用钢笔勾出这张褶皱的纸的外轮廓。 吸取一个深紫色,作为基色。 然后,我们来用套索工具,...<a href="http://www.tulaoshi.com/n/20160215/1563823.html" target="_blank">[ 查看全文 ]</a></div>
<div class="span_em ">
<div class="cai_list_font"><a href="/user/青狱千循/" target="_blank"><img src="http://static.tulaoshi.com/html/tulaoshi_new/images/touxiang/13.jpg" /><span>青狱千循</span></a></div>
<span class="font_span"><a class="em_s" href="javascript:;">48</a><a class="em_s2" href="javascript:;">1</a></span></div>
</div>
</li>
<li>
<div class="xiang_892_2_1"><a href="/reader/1566801" target="_blank"><img src="http://img.tulaoshi.com/201602/16/366a09fd54ce760623107e8fbc1d904c_thumb_189.jpg" width="224" height="173"></a></div>
<div class="xiang_right clearfix">
<div class="xiang_right_1"><A href="http://www.tulaoshi.com/n/20160216/1566801.html" target="_blank">Photoshop制作融化效果的服装海报教程</A></div>
<div class="xiang_righ_lable">标签:<a href="http://www.tulaoshi.com/ps/" target="_blank">PS</a> <a href="http://www.tulaoshi.com/psjichu/" target="_blank">PS基础</a></div>
<div class="span_em_123"> <a href="http://www.tulaoshi.com/n/20160216/1566801.html" target="_blank">[ 查看全文 ]</a></div>
<div class="span_em ">
<div class="cai_list_font"><a href="/user/暗黑料理day/" target="_blank"><img src="http://static.tulaoshi.com/html/tulaoshi_new/images/touxiang/21.jpg" /><span>暗黑料理day</span></a></div>
<span class="font_span"><a class="em_s" href="javascript:;">36</a><a class="em_s2" href="javascript:;">1</a></span></div>
</div>
</li>
<li>
<div class="xiang_892_2_1"><a href="/reader/1512405" target="_blank"><img src="http://img.tulaoshi.com/201601/29/dd55495cfee167f7a4be2e1be2270ffa_thumb_189.jpg" width="224" height="173"></a></div>
<div class="xiang_right clearfix">
<div class="xiang_right_1"><A href="http://www.tulaoshi.com/n/20160129/1512405.html" target="_blank">Photoshop设计创意:打造撕裂的旧海报效果</A></div>
<div class="xiang_righ_lable">标签:<a href="http://www.tulaoshi.com/ps/" target="_blank">PS</a> <a href="http://www.tulaoshi.com/psjiaocheng/" target="_blank">PS教程</a></div>
<div class="span_em_123">最终效果先看一下: screen.width*0.7) {this.resized=true; this.width=screen.width*0.7; this.style.cursor=](http://img.jcwcn.com/attachment/portal/2007-10/10/46180/20071009162458_20.jpg) [ 查看全文 ]
[ 查看全文 ]


本教程中我们利用Photoshop制作一只迷幻神奇的老虎,主要是利用渐变和绘画技巧等来制作出海报的生动画面效果。
最终效果
1.创建一个新的文档,并如下图设置,将背景填充为黑色
图1
2.下载一张"老虎"图片,寻找那种虎头正面的图片,然后使用钢笔工具将其面部抠选下来
[ 查看全文 ]